|
|
| (8 intermediate revisions by one other user not shown) |
| Line 24: |
Line 24: |
| | | | |
| | === Software === | | === Software === |
| − | ==== Installing ====
| |
| | | | |
| − | To start working with Hokuyo scanner you have to install ROS drivers. Instruction for different ROS versions can be found here: [http://wiki.ros.org/hokuyo_node] and here [http://wiki.ros.org/urg_node]. After installing do not forget to set udev rule! | + | To start working with Hokuyo scanner you have to install ROS drivers. Informations for different ROS versions can be found here: [http://wiki.ros.org/hokuyo_node Hokuyo node] and here [http://wiki.ros.org/urg_node urg node]. |
| | | | |
| | + | ==== Setting udev rule ==== |
| | | | |
| − | The Hokuyo essentially works by sending and receiving commands over the SCIP protocol. The URG-04LX-UG01 has an USB connection, and is treated as a serial device. That means the Linux kernel already provides drivers for such devices. It will be added per default as /dev/ttyACMx whereas x stands for a running number. Further documentation can be found here: http://www.hokuyo-aut.jp/02sensor/07scanner/download/urg_programs_en/index.html
| + | In order to use the Hokuyo under Ubuntu you need to add a so-called udev rule first, so that the system will recognize it as a Hokuyo sensor. |
| | | | |
| − | To check if the Hokuyo is found you can type dmseg. You should have something similar like this:
| + | For creating the rule you need to create a file under /etc/udev/rules.d and edit it, e.g. with |
| | | | |
| − | <pre> $ dmesg
| + | <code> |
| − | ...
| + | $ sudo nano /etc/udev/rules.d/47-hokuyo.rules |
| − | [ 2822.168000] usb 3-1: new full speed USB device using uhci_hcd and address 2
| + | </code> |
| − | [ 2822.328000] usb 3-1: configuration #1 chosen from 1 choice
| + | |
| − | [ 2822.440000] cdc_acm 3-1:1.0: ttyACM0: USB ACM device
| + | |
| − | [ 2822.444000] usbcore: registered new interface driver cdc_acm
| + | |
| − | [ 2822.444000] /build/buildd/linux-source-2.6.22-2.6.22/drivers/usb/class/cdc-acm.c:
| + | |
| − | v0.25:USB Abstract Control Model driver for USB modems and ISDN adapters</pre>
| + | |
| | | | |
| − | ==== Usage ====
| + | Copy the following contents into the file: |
| − | The manufacturer of Hokuyo offers a sample application (among others) to check, if the Hokuyo works.
| + | |
| − | It is called vmon. To use it download the file http://www.hokuyo-aut.jp/02sensor/07scanner/download/data/vmon_linux.zip and follow the install instructions.
| + | |
| | | | |
| − | ====Useful tips ==== | + | <code> |
| | + | KERNEL=="ttyACM[0-9]*", ACTION=="add", ATTRS{idVendor}=="15d1", MODE="0666", GROUP="dialout", SYMLINK+="sensors/hokuyo" |
| | + | </code> |
| | | | |
| − | They can be summarized as follows:
| + | When you then connect the Hokuyo via the USB cable to the PC, it should be recognized as /dev/sensors/hokuyo |
| | | | |
| − | Unpack the archive and go to the vmon linux folder:
| + | Note: this only works for one Hokuyo connected at a time. If you want to use multiple Hokuyos simultaneously, then check out [http://wiki.ros.org/hokuyo_node]. |
| | | | |
| − | $ sudo apt-get install libboost libboost-date_time
| |
| − | $ sudo apt-get install libboost-filesystem libboost-thread libxmu6 libxxf86vm1
| |
| − | $ sudo dpkg -i libscipcomm_0.2_i386.deb vmon_0.2_i386.deb
| |
| | | | |
| − | Start the application by typing:
| + | Go back to [[Sensors | Sensors]] |
| − | | + | |
| − | $ sudo vmon
| + | |
| − | | + | |
| − | Finally right click and select Connect and then /dev/ACM0* (assuming the device has number 0).
| + | |
| − | By default an user application will need root permissions, so you can use sudo (as seen above) or manually set permissions:
| + | |
| − | | + | |
| − | $ sudo chmod a+rw /dev/ttyACM0
| + | |
| − | | + | |
| − | Instead of setting permissions (each time) of ttyACM* devices a udev rule can be used. To do so create a new group usb and add the user to this group. Of course needs to be replaced by the actual user name of the logged in user, e.g. youbot in case of the default system configuration for the onboard PC of the KUKA youBot.
| + | |
| − | | + | |
| − | $ sudo groupadd usb
| + | |
| − | $ sudo usermod -aG usb
| + | |
| − | | + | |
| − | Then create a new udev rule for Hokuyo devices:
| + | |
| − | | + | |
| − | $ sudo touch /etc/udev/rules.d/47-hokuyo.rules
| + | |
| − | | + | |
| − | Add the following line, save and replug:
| + | |
| − | | + | |
| − | SUBSYSTEMS=="usb", KERNEL=="ttyACM[0-9]*", ATTRS{manufacturer}=="Hokuyo Data Flex for USB", ATTRS{product}=="URG-Series USB Driver", MODE="0666", SYMLINK+="sensors/hokuyo"
| + | |
| − | | + | |
| − | This udev rule has two effects: a) it always grants correct permissions and b) it creates a constant system link: /dev/sensors/hokuyo which can be used instead of/dev/ttyACM*. The latter one would change each time the Hokuyo is replugged.
| + | |
| − | | + | |
| − | NOTE: This behavior might not be intended in case of two or more Hokuyos. A good starting point to add Hokuyo system links with unique IDs can be found here:
| + | |
| − | | + | |
| − | http://www.ros.org/wiki/hokuyo_node#Using_udev_to_Give_Hokuyos_Consistent_Device_Name
| + | |
| − | | + | |
| − | == Instaling Hydro ==
| + | |
| − | git clone http://github.com/ros-drivers/hokuyo_node -b hydro-devel
| + | |
Latest revision as of 16:48, 23 June 2015
Hokuyo URG-04LX-UG01
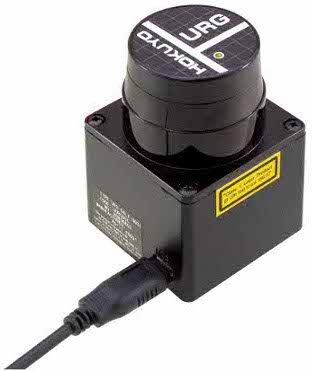
- Interface: USB2.0/1.1[Mini B](Full Speed)
- Power supply: 500mA or less (Rush current 800mA)
For more information, visit the official website.
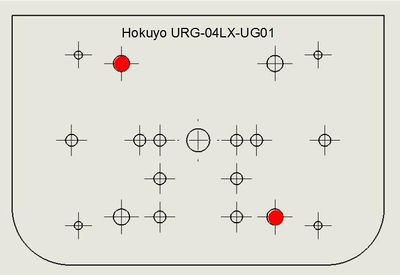
Mounting the sensor on the youBot
First mount the sensor on the universal sensor carrier.
Holes used
To mount the sensor on the sensor carrier, use
and the holes shown below.
Powering the sensor
To power the sensor, use the provided special USB-Y Cable with 2 x Plugs A to mini B.
Software
To start working with Hokuyo scanner you have to install ROS drivers. Informations for different ROS versions can be found here: Hokuyo node and here urg node.
Setting udev rule
In order to use the Hokuyo under Ubuntu you need to add a so-called udev rule first, so that the system will recognize it as a Hokuyo sensor.
For creating the rule you need to create a file under /etc/udev/rules.d and edit it, e.g. with
$ sudo nano /etc/udev/rules.d/47-hokuyo.rules
Copy the following contents into the file:
KERNEL=="ttyACM[0-9]*", ACTION=="add", ATTRS{idVendor}=="15d1", MODE="0666", GROUP="dialout", SYMLINK+="sensors/hokuyo"
When you then connect the Hokuyo via the USB cable to the PC, it should be recognized as /dev/sensors/hokuyo
Note: this only works for one Hokuyo connected at a time. If you want to use multiple Hokuyos simultaneously, then check out [1].
Go back to Sensors

