Mounting and connecting sensors
Asus

- Interface: USB 2.0
Mounting the sensor on the youBot
The sensor comes without holes. Therefore you should drill two and here is how:
- Tilt the sensor backwards and with a tip of flat-blade screwdriver remove the right cover of the sensor.
- Remove the screw holding the sensor and its base together. It should look like that.
- Align the sensor base in the middle of the sensor carrier and place the two parts in a bench mount to hold them firmly together. Using the outer holes of the sensor carrier as driver and a 3 mm drill bit, drill one hole through the asus base and the sensor carrier. Repeat for the other side. (The distance between the holes is 66 mm)
- By using two M3x10 screws mount the base on the sensor carrier as shown below.
- Finally, insert back in place the screw from step 1 and you are done.


Holes used
To mount the sensor on the sensor carrier, use
- 2 x M3 length 10
and the holes shown below.

Powering the sensor
To power the sensor, plug the USB cable at one of the available USB ports.
Kinect

- Interface: USB 2.0
- Power supply: 12 V / 1.08 A
Mounting the sensor on the youBot
The Kinect Sensor can be mounted on the youBot using the Universal Sensor Carrier. This sensor has no mounting points by default. But you can still mount it on the sensor carrier. Follow these steps:
Remove or cut the rubber layer at the corner of the base and unscrew the screws, which are under the rubber.

There are 4 screws at the corners under the rubber layer
Replace the old screws with new ones, which are long enough to mount the sensor carrier together with the kinect's base, as shown below.

Holes used
To mount the sensor on the sensor carrier, use the holes shown below.

Powering the sensor
According to the specifications the sensor need 12 V / 1.08 A. The youBot doesn't have a 12 V Output, but it has a 24 V Output. Therefore you can :
- use a DC / DC converter to convert the youBot 24 V Output to 12V. The DC / DC converter should supply 12 V and at least 18 W or
- use a 12 V battery to power the sensor
If you also want to purchase a compatible plug for the 24 V Output, consider using a Neutrik NC3MX.
SwissRanger SR4000
- Interface: USB 2.0 or Ethernet, according the model ordered
- Power supply: 12 V / Typ. 0.8 A, Min 0.6 A, Max 1.0 A

For more information, visit the official website.
Mounting the sensor on the youBot
First mount the sensor on the universal sensor carrier.
Holes used
To mount the sensor on the sensor carrier, use
- 4 x M4 length 8
- you don't need an extra screw for the middle
and the holes shown below.

When mounted on the arm, it should like the following :

Powering the sensor
According to the manufacturer the sensor needs 12 V / 2 A power supply. The youBot doesn't have a 12 V Output, but it has a 24 V Output. Therefore you can :
- use a DC / DC converter to convert the youBot 24 V Output to 12V. The DC / DC converter should supply 12 V and at least 24 W or
- use a 12 V battery to power the sensor
If you also want to purchase a compatible plug for the 24 V Output, consider using a Neutrik NC3MX.
Hokuyo URG-04LX-UG01

- Interface: USB2.0/1.1[Mini B](Full Speed)
- Power supply: 500mA or less (Rush current 800mA)
For more information, visit the official website.
Mounting the sensor on the youBot
First mount the sensor on the universal sensor carrier.
Holes used
To mount the sensor on the sensor carrier, use
- 2 x M3 Depth 8
and the holes shown below.

Powering the sensor
To power the sensor, use the provided special USB-Y Cable with 2 x Plugs A to mini B.
Microsoft LifeCam

- Interface: USB2.0
- Power supply: Through USB
For more information, visit the official website.
Mounting the camera on the youBot arm
To mount the camera on the youBot arm, you will need the following pieces
- 1 x Universal sensor carrier
- 1 x pair of brackets (left and right)
- 1 x M3 length 20 mm
- 2 x M3 length 5 mm

First mount the camera on the brackets using the long screw.
- LifeCam with Brackets (Before & After the assembly)

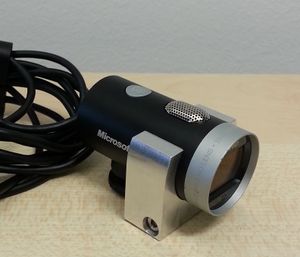


Then mount the camera on the universal sensor carrier.
Holes used
To mount the sensor on the sensor carrier, use
- 2 x M3 length 5
and the holes shown below :

The camera on the Universal Sensor Carrier, should look like that :

Afterwards mount the Universal Sensor Carrier on the Arm
And your assembly should look like

And when you mount the gripper back in place, the arm should look like :

Powering the sensor
To power the sensor, plug the USB cable at one of the available USB ports.
Corrections, suggestions, and new documentation should be posted to the Forum.